While Studio 10 handles structural integrity and distortion correction, the Visualizer Studio Toolkit focuses on visual fidelity. It bridges the gap between technical execution and marketing approval by generating hyper-realistic virtual mockups.
Open your 2D artwork document in Illustrator and open the Esko Studio window. Load the 3D model exported from Toolkit.
Shrink sleeve repackaging involves updating artwork for existing products (e.g., limited editions, regulatory changes, cost reductions) without altering the physical mold or container. Esko’s suite—Studio 10 (3D CAD & visualization) + Visualizer Studio Toolkit—reduces repackaging errors, material waste, and approval cycles by up to 60% compared to physical prototyping.
| Component | Function for Shrink Sleeves | |-----------|----------------------------| | | 3D structural design, distortion compensation (shrinkage mapping), and virtual folding of shrink sleeves. | | Visualizer Studio Toolkit | Real-time photorealistic rendering, substrate simulation (matte/gloss/PE/PETG), and lighting environment matching. | | Shrink Sleeve Toolkit (add-on) | Dedicated shrink profile database, heat tunnel simulation, and seam placement optimization. |
Emulates clear windows within the sleeve, showing the liquid level or color of the product inside the bottle. Lighting and Environment Context While Studio 10 handles structural integrity and distortion
What (e.g., contoured glass, trigger sprays, aluminum cans) are you primarily targeting for this repack?
The Toolkit exports standard Collada (.dae) files that can be reused across different artwork versions.
Who is the for this article? (e.g., prepress technicians, brand managers, beginner designers?) Share public link
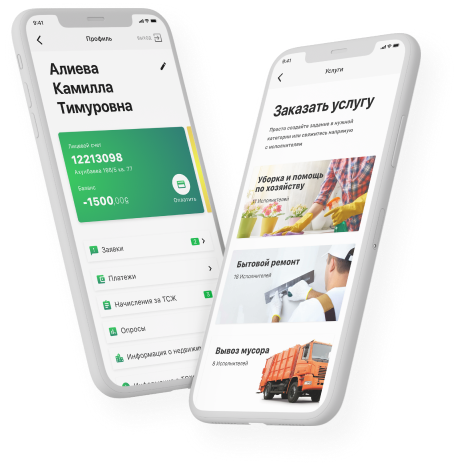
One of the key features of this workflow is the ability to export the final, shrunk visualization into industry-standard file formats including 3D PDFs , QuickTime movies, or JPGs. Brand owners who do not own Esko software can download a free Studio Visualizer viewer to inspect the multipack model in 3D, zooming in and out to check barcode readability or panel alignment. Load the 3D model exported from Toolkit
artwork. By analyzing the simulation, the software can counter-distort graphics in Illustrator so that they appear perfectly straight and uncompromised once the physical sleeve is shrunk onto the final product. Repack Efficiency
Once the container geometry is established, the designer wraps a virtual shrink sleeve around it. The Toolkit requires key physical parameters to simulate the shrink process accurately:
Despite its advantages, designing and producing shrink sleeves can be a complex and challenging process. The shrink sleeve must be carefully designed to fit snugly around the product, taking into account factors such as product shape, size, and material. Moreover, the design must also consider the shrink sleeve's material properties, such as shrinkage rate, thickness, and texture. Any errors in design or production can result in costly rework, delays, or even product recalls.
The high-quality 3D visuals and interactive PDFs serve as powerful communication tools. Clients can see an accurate representation of the final product, complete with lighting, materials, and contextual shelf placement. They can approve designs faster, without waiting for physical samples to be shipped, which streamlines the entire design-to-print lifecycle. | Component | Function for Shrink Sleeves |
Once the container model is loaded into the Toolkit for Shrink Sleeves, you define the parameters of the sleeve. You specify the upper and lower boundaries of the sleeve on the container, as well as the initial cut width of the flat film. The software then generates a virtual 3D sleeve wrapped loosely around the container model. Step 3: Simulating the Shrink Process
I can provide specific settings for your material simulation. Share public link
Esko Studio is a modular set of 3D packaging design tools that integrates directly into Adobe Illustrator. The is a specialized module within this ecosystem. It bridges the gap between structural 3D CAD data and 2D graphic design.
Place the original repack graphic assets onto the design layer. Use the Studio 10 interface to link specific graphic components to the structural zones of the bottle.
Load the technical 3D file of the new container shape into the Studio Toolkit.